

Which Raspberry Pi Should I Buy 2018 Usenet Torrent Downloading
We are reader supported and may receive a commission when you make purchases using the links on our site.
How to turn your Raspberry Pi into a VPN server – Installation guide

Running your ain VPN server is a peachy way to increase your mobile security and get access to your LAN from the internet, just they're notoriously hard to gear up upwardly. Pi VPN turns your Raspberry Pi into a cheap, effective VPN server using a guided installation that does almost of the hard work for you.
Yous'll be able to featherbed website filters at work or school, and easily connect to devices on your home network similar fileservers or printers. And with just a few actress steps, you can too enable end-to-finish encryption and run all of your mobile internet through a secure and anonymous tunnel.
What is Pi VPN?
Pi VPN is a lightweight OpenVPN server designed to run on Raspberry Pi 2 or three. Information technology gives you access to your dwelling house network through a secure connectedness over the internet. Past plugging a Raspberry Pi into your router, information technology acts somewhat like a bridge between mobile devices and your network.
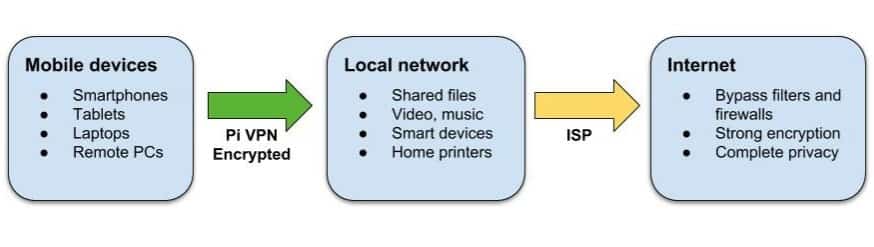
You can utilise Pi VPN to:
- Access your files, music, and movies from anywhere
- Encrypt your mobile cyberspace connection
- Print on your domicile printers from your laptop
- Bypass firewalls and website restrictions at work and away
- Hibernate your mobile IP accost
- Connect with your habitation cameras and smart devices
If yous observe yourself forwarding a lot of services through your router, a home VPN connection is a more than secure culling. Each port you lot forward is a tunnel that someone, somewhere could apply to get into your network. Pi VPN only opens ane port, and it uses strong encryption to keep your LAN secure.
Choosing a VPN provider
One of the most of import choices before you fifty-fifty brainstorm this project is which VPN provider you lot'll use. And when you're making that choice, the factors you demand to keep in mind are security, bandwidth, and latency.
Security is vital, you need to know that your VPN provider won't keep logs of your connexion. Just bandwidth and latency are just every bit important in this example. If you choose a provider with high ping times or not enough bandwidth, your internet connectedness is going to suffer.

With that in mind, I recommend yous use IPVanish for this project. IPVanish has some of the lowest latency times and highest bandwidth of any provider, and we tested many. That will keep your connection snappy and responsive, even when you're browsing the web through a double-hop VPN connection.
FAST AND RELIABLE: IPVanish has a large network of uncongested servers that hits great speeds. Strong security and privacy features. A favorite for Kodi and Amazon Burn Stick for their apps and streaming capabilities. Family friendly as it tin handle upwardly to 10 simultaneously continued devices. Try information technology risk-free with the seven-mean solar day money back guarantee.
Getting ready for Pi VPN
In club to get started, you lot're going to demand:
- a Raspberry Pi 2 or 3 with Raspbian installed
- an 8GB or larger memory card
For best results, the Raspberry Pi should be connected to a router with an ethernet cablevision, but a wifi connexion will piece of work, besides. If you're using wifi, y'all'll need to substitute wlan0 for eth0 throughout this tutorial.
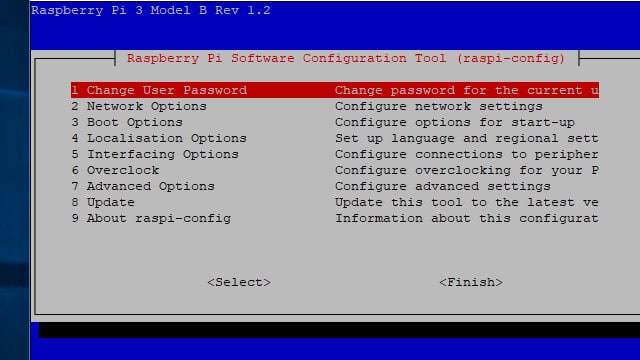
Plough on the SSH service in Raspberry Pi Config by enabling it in the Interfacing options bill of fare. You tin can launch the configuration tool from the Pi menu or utilize this command:
sudo raspi-config
Reboot your Pi later you enable the SSH server.
Once your Pi is connected to your home network with SSH turned on, you can disable the 10 desktop and unplug your monitor if y'all want. Information technology's just equally easy to connect to your Raspberry Pi remotely using a utility like Putty or your Mac's terminal every bit it is to type straight on the Pi.
Connecting to your Raspberry Pi
Nigh of the time you lot'll desire to run your Pi VPN server without needing to plug it into a monitor. That's easy to exercise equally long as you have a secure shell (SSH) client. Using SSH, you tin become access to your Raspberry Pi's command line from another calculator.
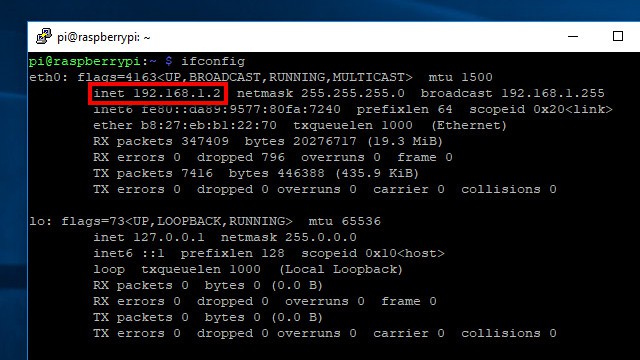
Earlier disconnecting your Raspberry Pi from its monitor, run the command ifconfig to show your Pi'due south IP address. It's listed in the inet field as shown in a higher place. You lot'll need it to connect your SSH client.
If y'all're going to exist setting up your Pi VPN server in Windows, use Putty to connect to your Raspberry Pi. Yous can download Putty hither for costless.
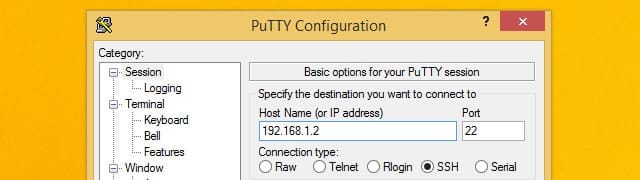
In one case Putty is up and running, connect to your Raspberry Pi by typing the IP address you noted earlier. Also brand sure that the Connection type is set to SSH. Click the Save button to create a profile for this connexion.
If yous're installing Pi VPN using a computer running Mac or Linux, there'south no reason to download an SSH client. Only use your operating arrangement'due south concluding; it supports SSH past default.
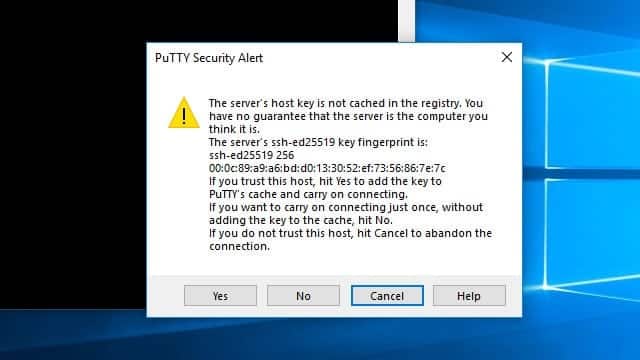
The first fourth dimension yous connect to your Raspberry Pi, you'll be prompted to save a security key. Click the Aye button to accept the fundamental as valid and save it on your estimator.
Next, enter your password. If you haven't inverse information technology withal, Raspberry Pi uses raspberry as the default password.
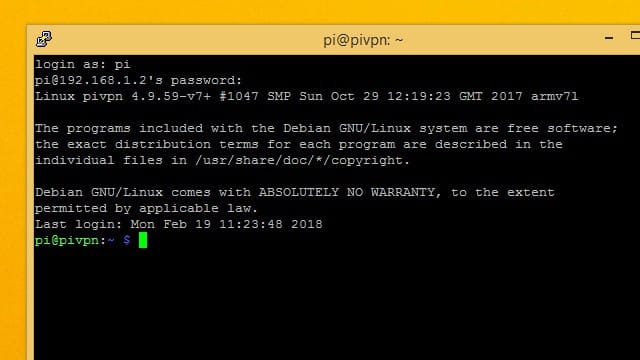
Yous've logged in successfully when you run into the pi@hostname prompt.

It'due south a good idea to modify your default password the commencement fourth dimension you connect over SSH. You can do that using the passwd command.
Updating Raspbian for Pi VPN
Make sure your operating system is upwards to engagement before y'all install Pi VPN.
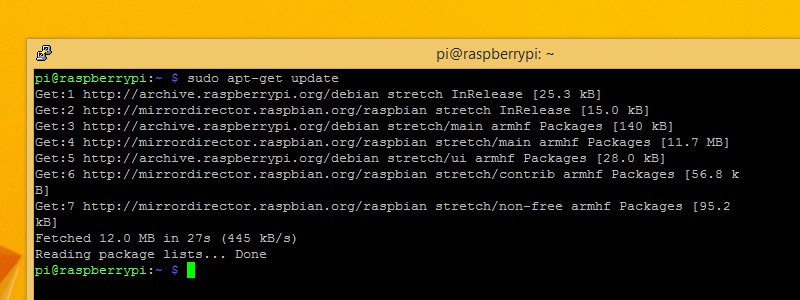
Kickoff, go a listing of all of the latest software. Yous can check for the latest versions of everything you have installed with the control:
sudo apt-get update
Once you have the latest list of software, tell your Raspberry Pi to upgrade itself with the command:
sudo apt-get upgrade
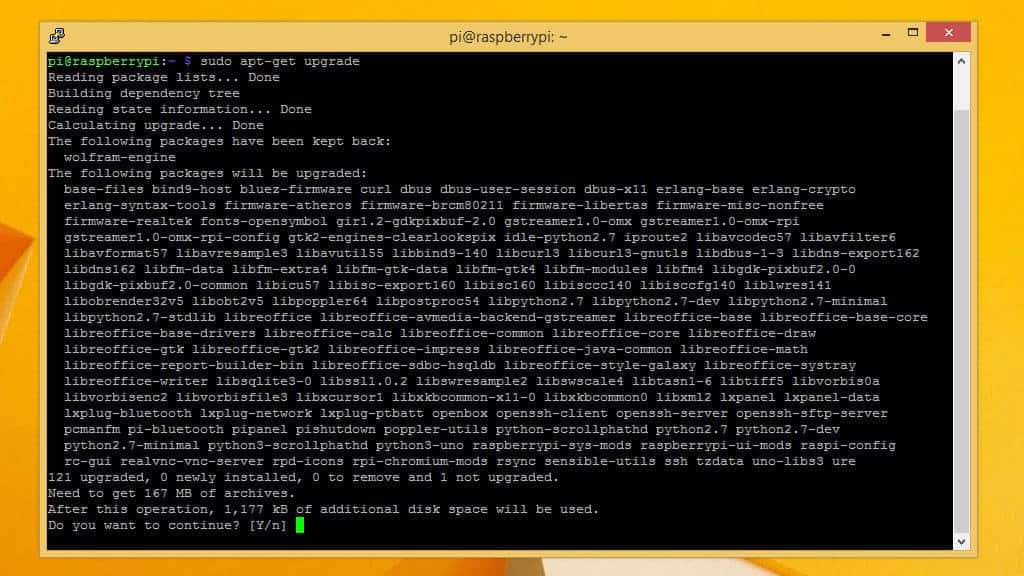
Yous'll be prompted to press Y if yous desire to upgrade, and you lot should do it. It will accept a few minutes for the upgrade process to run, and you can watch the progress on screen.
Setting a static IP address
Since you're going to be relying on your Raspberry Pi for network services, yous'll need to know where to find it. That means you'll take to prepare a static IP address before you brainstorm.
You can also have this chance to modify your hostname. Among other things, that will change the prompt you see when you're logged in. It'southward an easy way to tell multiple Pi's apart, but changing your hostname is optional.

You'll need to edit /etc/dhcpcd.conf to set a static IP address. Before you open the file, make sure you know your router's IP address and the DNS servers you'll be using. If you don't already take that information, you can get it using ifconfig.
Once yous're ready, use this control to open information technology in the nano text editor:
sudo nano /etc/dhcpcd.conf
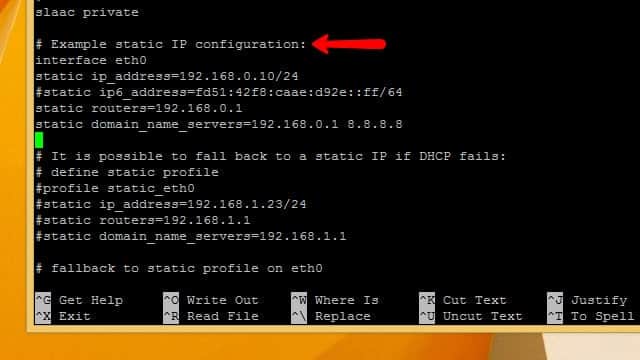
Scroll through the file until you see a line labeled Example static IP configuration. All you'll need to do is uncomment the example configuration and make a few substitutions with your IP accost, router, and gateways.

Uncomment static ip_address and substitute the static IP address you'd like to use. I've chosen 192.168.1.2 considering it'southward close to the router's IP address and easy to remember.

Uncomment static routers and static domain_name_servers and insert your own values. Once you've made your changes, press Ctrl+Ten to quit, then Y to confirm that you want to save.
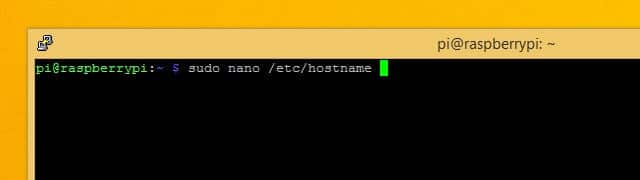
If yous're going to change your hostname, open /etc/hostname in nano every bit root with the following command:
sudo nano /etc/hostname

Change your hostname in the file then press Ctrl+X in guild to exit the editor, and Y to save the file.
You'll have to practice the same affair with the file at /etc/hosts. The command to edit the file is:
sudo nano /etc/hosts
Scroll down until you meet 127.0.0.1 and change the hostname to whatever you've called. In my instance, that's pivpn. When you lot're done, tell your Raspberry Pi to restart with the post-obit command:
sudo reboot
After your Pi restarts, make sure to update the IP address that you're connecting to in order to reverberate the new static IP accost.
Figuring out Raspbian'southward firewall
Since Raspbian is a Linux operating system, the firewall is built into the kernel and enabled by default. But on a new installation information technology'due south left broad open.
Raspbian's firewall (iptables) policy is to allow all entering and outbound packets, and forwards anything that requests it. Later, I'll prove yous how to lock down the firewall, just before you begin make sure it's completely open up to connections.
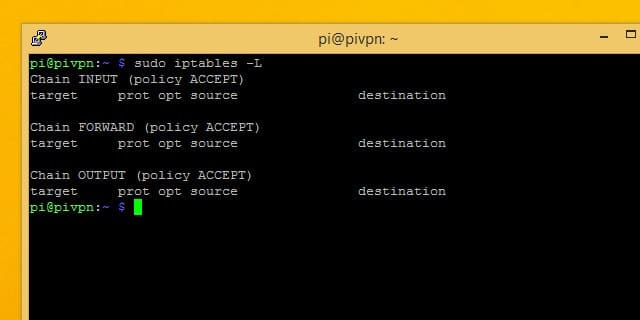
You can use iptables -L to list your electric current firewall rules and make sure they match the ones above. If yous've been changing the firewall, you tin can restore it to default with the following commands:
sudo iptables -F sudo iptables -P INPUT Have sudo iptables -P OUTPUT Accept sudo iptables -P FORWARD Accept
Choosing an encryption level
When you're setting upwards your Pi VPN, you'll be asked to choice the force of your encryption. Y'all'll be able to cull from 1024-scrap, 2048-scrap, and 4096-bit RSA encryption. Here'southward what you lot have to keep in listen:
- 2048-scrap RSA encryption is the standard
- Using weaker encryption allows for higher speed
- 2048-fleck is proficient for downloading, and streaming
- Using stronger encryption provides more protection
- 4096-bit is best used for email and browsing
Enabling 4096-chip RSA is tempting but, if yous're going to be streaming video or playing music through your connexion, it will add a lot of overhead and slow things downwardly noticeably. 2048-bit encryption is the standard for a reason, and I recommend you apply information technology in most cases.
Timing out during long operations
SSH has a quirk, and sooner or subsequently you'll discover information technology for yourself. During long operations, if you're connected to your Pi through SSH, the connection will driblet when your calculator goes to slumber. As shortly as the SSH connection drops, the command you were running on your Pi stops beingness executed and you have to beginning over.
A utility called screen makes long SSH operations a lot easier to deal with. Using screen, you tin can kickoff a session that's tied to a single functioning. Then yous can connect or disconnect whenever yous want, and come up back to the session to check on its progress.
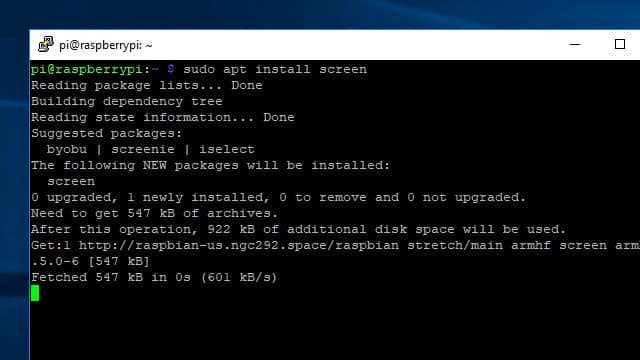
Once you install screen, you only need to know a few commands to use information technology. Go started by using apt to install screen:
sudo apt-get install screen
In one case screen is installed, launch information technology with this command:
screen
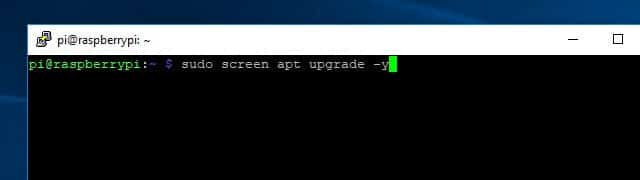
It won't look similar anything happened, but at present whatever commands you requite won't stop running if you lot disconnect.
So if your connectedness drops, just SSH back into your Raspberry Pi and type:
screen -r
You'll automatically be reconnected to the SSH session, every bit long as it'south the only 1 agile.
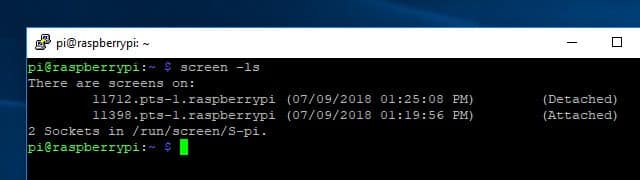
If yous accept more than 1 active screen session, you can list them with the command screen -ls. If you lot desire to connect to a session you lot come across in the listing, you'll need the five-digit ID. So to reconnect to session 11712, I would use this command:
screen -r 11712
Once you get used to using it, screen makes managing your Raspberry Pi with SSH a lot more pleasant. You tin learn more about all the different things screen is capable of here.
Installing Pi VPN
Once you've got your Raspberry Pi sorted out, you can connect to information technology and begin installing Pi VPN. This is the offset part of a multi-part install, and it will provide the backend VPN functionality you lot need to connect to Pi VPN. In later steps, we'll install a management web page and configure an outbound VPN connection for privacy.
Launching the installer
Pi VPN is installed through a script y'all download from its website using the curl command-line tool. Curl is just a tool for downloading from the internet without needing a browser.
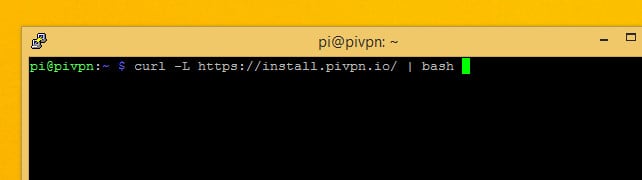
The command you need to run in order to become started installing Pi VPN is:
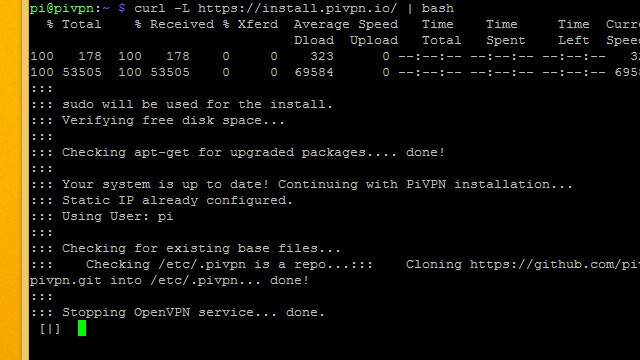
whorl -Fifty https://install.pivpn.io/ | bash
That command will download the installation script at pivpn.io and pipe it to the bash control interpreter for execution.
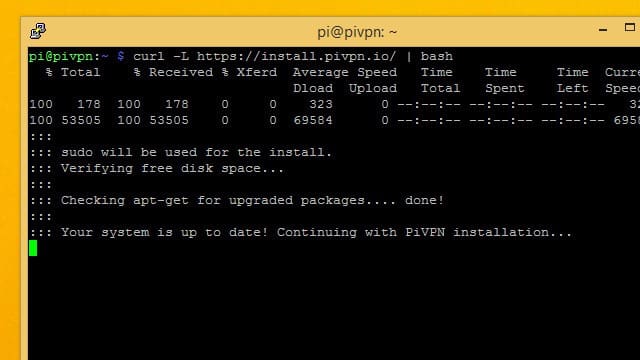
The installation process begins immediately. Information technology starts by checking apt to see if you have packages yous tin can update. If you're following this guide, you've already updated your system and so the script will move on to the side by side step.

A few necessary packages will be installed, and so the Pi VPN installer volition launch.
The Pi VPN installer
The Pi VPN installer is a pseudo-graphical setup wizard that's perfect to run over an SSH connection. When your screen turns blue and you're shown a message from the installer, you can get started.
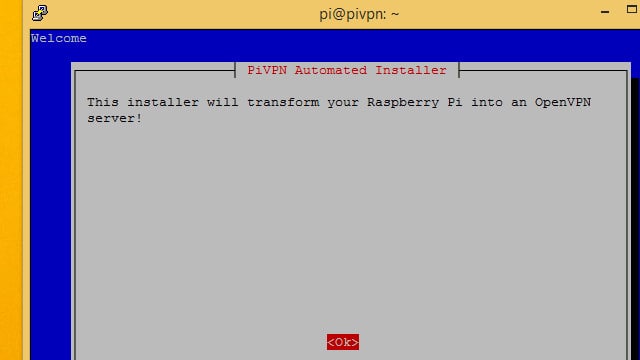
To brainstorm, press enter to tell the Pi VPN setup wizard y'all're set.
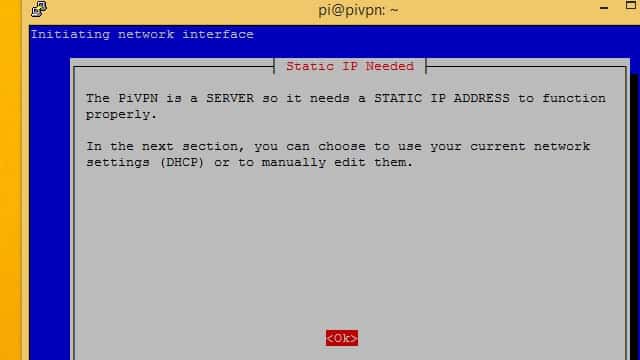
Yous'll exist warned that y'all need to ready a static IP accost. I recommend you do this earlier launching the setup wizard, so if you haven't already gear up a static IP address go out at present and follow the instructions in the previous section.
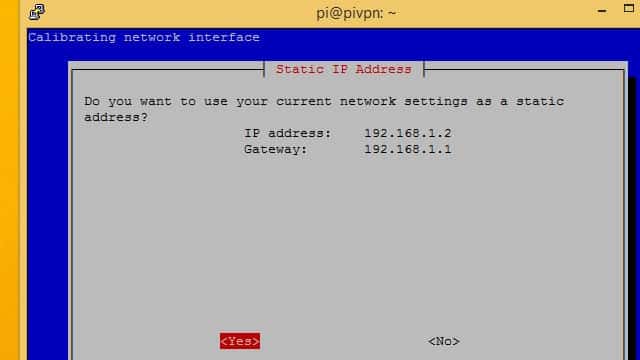
Pi VPN will evidence you the IP address it detected. If this is the static IP address you fix previously, press the Yeah button.
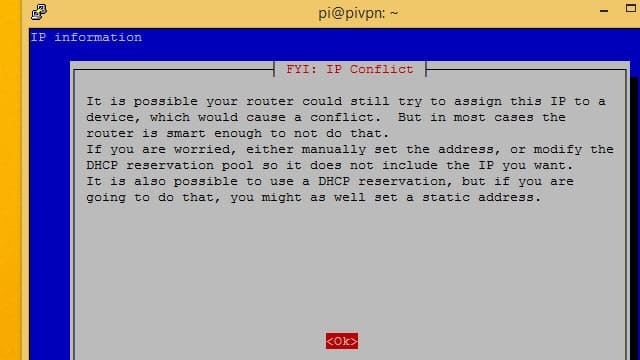
Y'all'll exist warned nigh IP address conflicts. The safest manner to avert conflicts is to wait on your router for the DHCP range, and utilise a static IP address exterior of that range.
In my case, I'm using 192.168.1.2 and my router assigns DHCP addresses betwixt 192.168.1.100 – 192.168.1.200 then there'due south no danger of conflict.
Press Ok to move forward.
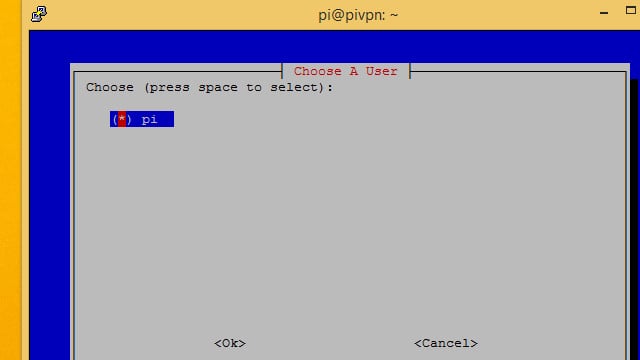
You'll desire to become with the default pi user in near cases, and so brand certain it's selected and press the Ok button.
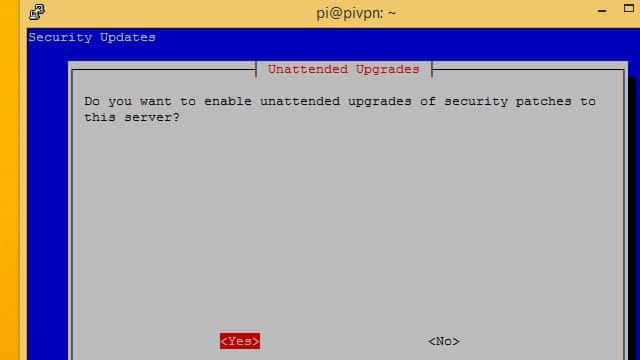
I recommend you click Yes to permit unattended security updates on your Pi VPN server. Your Pi will exist exposed to the internet through port forwarding, so it's especially important that Pi VPN stays up to appointment.
If you click No, take care to run regular updates on your own.
It's normal to exist shown the panel for a moment afterward configuring automated updates. The installer volition come dorsum after a few seconds.
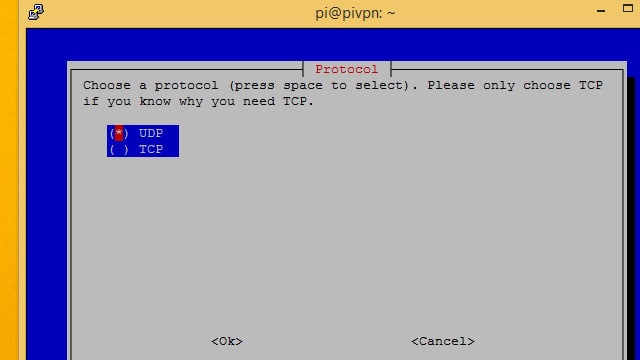
In near cases, you'll want to setup Pi VPN using the UDP protocol. If you're planning on using a subscription VPN provider to create an ultra-secure double-hop connection, use TCP.
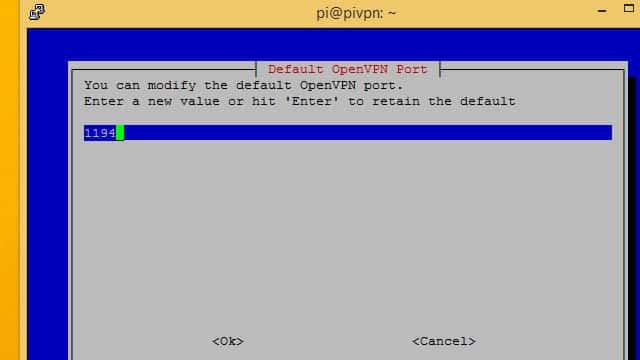
Take note of which port number yous're using for Pi VPN; you'll demand information technology later.
Port 1194 is the default for UDP, while TCP defaults to port 443. If you're following instructions to create a double-hop VPN, practice non use the default TCP port or it will cause a conflict later. I chose TCP port 4430 instead, because it was easy to recall.
Setting up encryption
Now you lot'll be able to cull your encryption level. Before I outlined each pick and why you might pick it. if you lot're unsure about which to option, take a await dorsum at my advice.
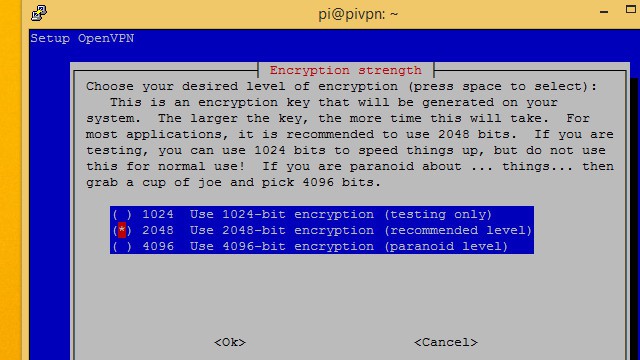
Select the level of encryption you'd similar to use with the space bar, then press Ok. I'k choosing to run2048-bit encryption so I tin can stream video over the connection.
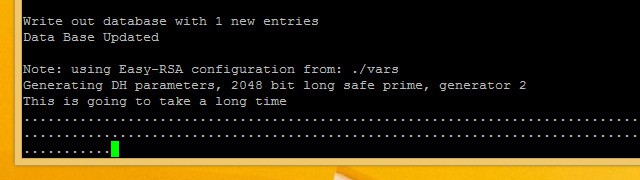
Generating these keys can take awhile. If you lot're using high-level encryption, it will take even longer. Exist patient and let Pi VPN generate your server keys.
Finishing the installation
Later on the server keys have been generated, the Pi VPN setup wizard is almost complete. Only a few more steps remain until you can connect.
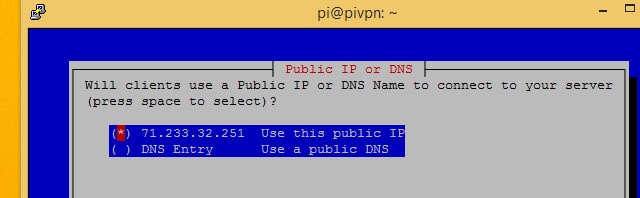
Select Use this public IP unless y'all accept a dynamic DNS account. If you're using dynamic DNS, choose DNS entry and enter your hostname and settings as usual.
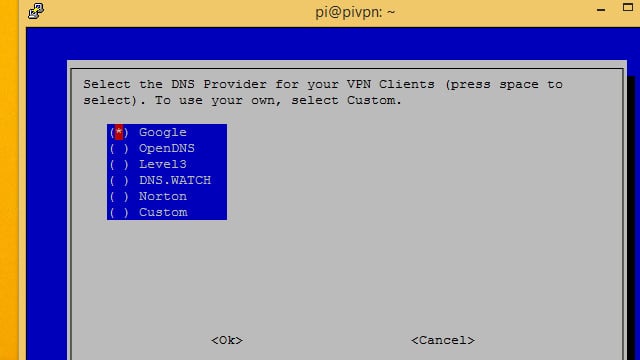
Next, you'll have to cull a DNS provider for your VPN. I recommend Google for well-nigh users, since it's free and easy. OpenDNS and Norton both provide secure DNS implementations if you're interested in locking down whatever potential DNS leaks. You might as well choose Custom if you're going to be treatment DNS requests with Pi-hole.
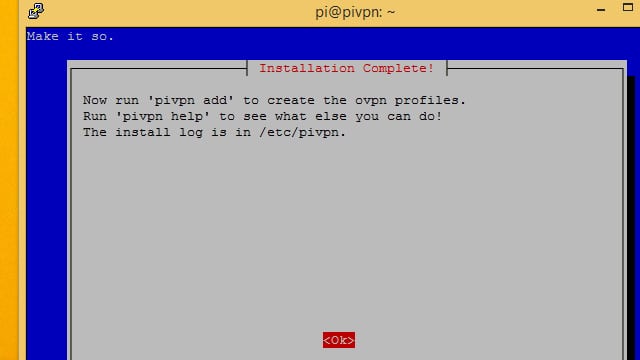
The setup wizard will tell y'all how to add users on the command line. In the next footstep, we'll be installing a spider web application to assistance manage users. You can also utilise pivpn add.
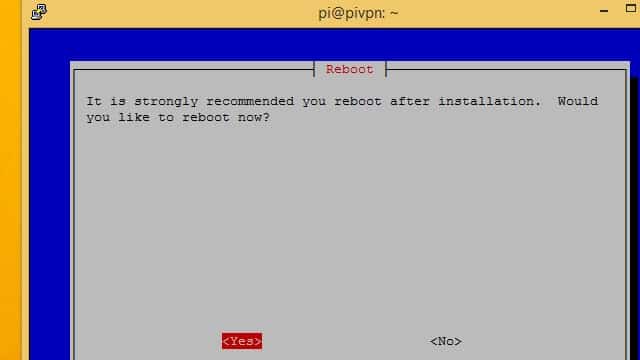
Finally, click the Yes button and reboot your Raspberry Pi.
Installing Pi VPN GUI
Pi VPN GUI is a spider web tool for Pi VPN. It's optional, but using it makes managing users and adding new devices a lot easier. I recommend you install it.
Every time yous add a user to PiVPN, you'll generate an *.ovpn profile. You can use Pi VPN GUI to both create the user business relationship and make it easy to download the profile.
If y'all choose not to apply Pi VPN GUI, you'll need to add and manage users with the pivpn add and pivpn remove commands. You'll also have to manually copy the *.ovpn profiles that are generated, usually using a command-line tool like scp.
Getting fix to install Pi VPN GUI
Before installing Pi VPN GUI, yous demand to update apt. Y'all'll have to add together a repository in order to download all of the software that Pi VPN GUI requires. Here's how to do it.
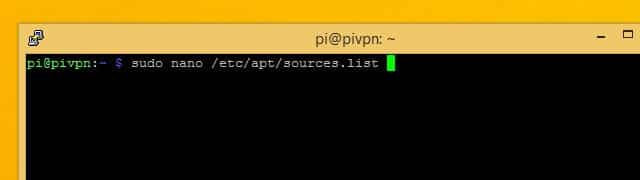
Use nano to edit apt'southward list of sources. The control is:
sudo nano /etc/apt/sources.list
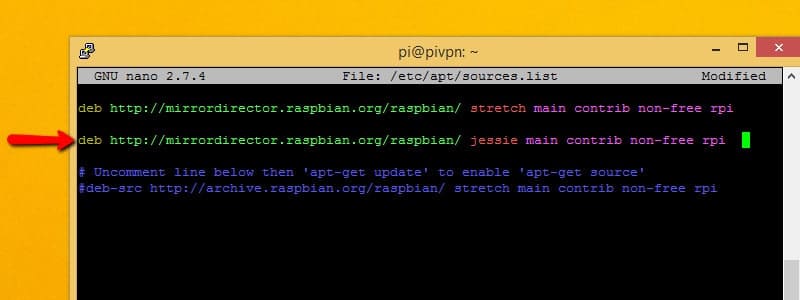
Add the following line to sources.list wherever you can find a spot:
deb http://mirrordirector.raspbian.org/raspbian jessie main contrib non-free rpi
That will tell apt that it'south okay to install packages from Debian Jessie, a previous release. That'southward necessary because some of the software that Pi VPN GUI relies on hasn't been added to the Debian stretch repositories yet.
Unfortunately, having a link to an erstwhile release in your sources.list file isn't a best do, even though we demand it at the moment. It can crusade conflicts later if you choose to install other software. It'southward a good idea to remove the line you lot just added after installing these software packages.
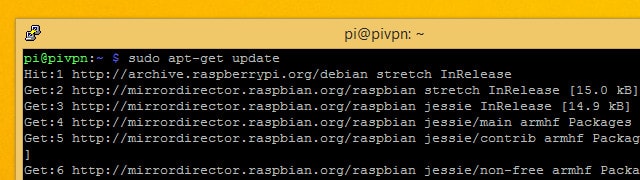
Next, salvage and quit nano. Update apt with the control:
sudo apt-go update
Once the check is complete, install any updated packages with the command:
sudo apt-get upgrade
That's all you need to exercise in order to add the necessary repository to apt. Now, install the prerequisites for Pi VPN GUI with the following command:
sudo apt-become install git apache2 php5 libapache2-mod-php5 php5-mcrypt look geoip-bin
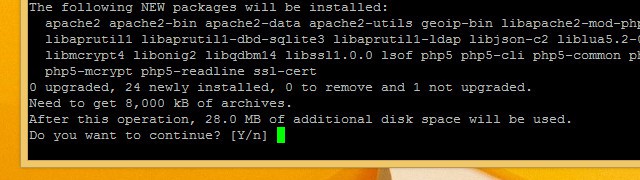
Printing Y when prompted, and let the installer run. When yous're finished installing software, you'll have to update some configuration files before you tin install Pi VPN GUI.
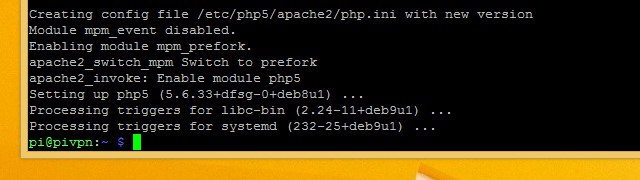
Now that the prerequisite software is installed, y'all should remove the line y'all added from /etc/apt/sources.list and run sudo apt update once again.
Updating the spider web configuration
Pi VPN GUI is a web app, and it needs an apache web server to run properly. We installed apache in the previous step, but at present a few changes have to be made earlier Pi VPN GUI can run on your apache server.

First, you'll need to alter the user business relationship that apache runs under. Information technology defaults to an unsupported account, and we demand to make it run every bit the user pi instead. Edit the apache config file using the command:
sudo nano /etc/apache2/apache2.conf
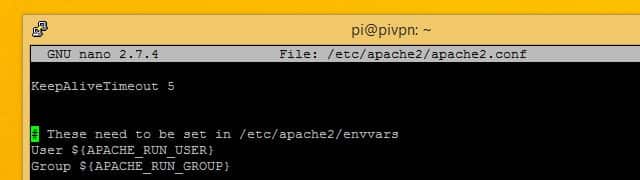
Scroll downward until yous meet the line that says User $(APACHE_RUN_USER) followed past Grouping.
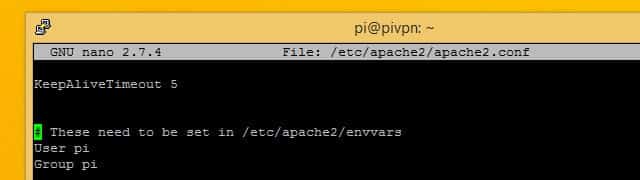
Change the values for User and Group to pi for both. Then press Ctrl+X to quit, and Y to save.

Next modify the owner for the /var/www directory that apache uses to shop websites in. You can give the user pi ownership of the web directory using this command:
sudo chown pi:pi -R /var/www

When you're finished, change into the /var/world wide web/html directory with this command:
cd /var/www/html
You should complete the Pi VPN GUI installation from that directory.
Downloading and installing Pi VPN GUI
Afterward all that work setting things upwardly, it'southward actually very like shooting fish in a barrel to download and install Pi VPN GUI. All you demand to do is check the project out using git. If you lot've followed forth, we installed the git utility in a previous stride.
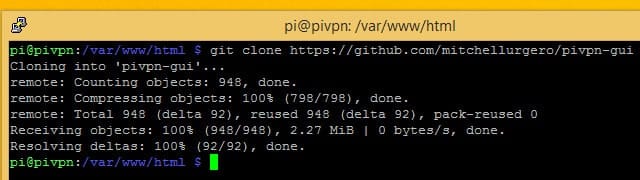
Brand sure you're still in the /var/world wide web/html directory and run the control:
git clone https://github.com/AaronWPhillips/pivpn-gui
The command will use git to clone Pi VPN GUI'due south projection directory in the root of your webserver, making it available as a web folio. You can check to come across if the installation was successful using your browser.
Connecting to Pi VPN GUI
Now that Pi VPN GUI is installed, you can open information technology in your browser and use information technology to manage Pi VPN users. I installed Pi VPN to my Raspberry Pi with an IP address of 192.168.ane.2, so I tin can find Pi VPN GUI at http://192.168.i.ii/pivpn-gui.
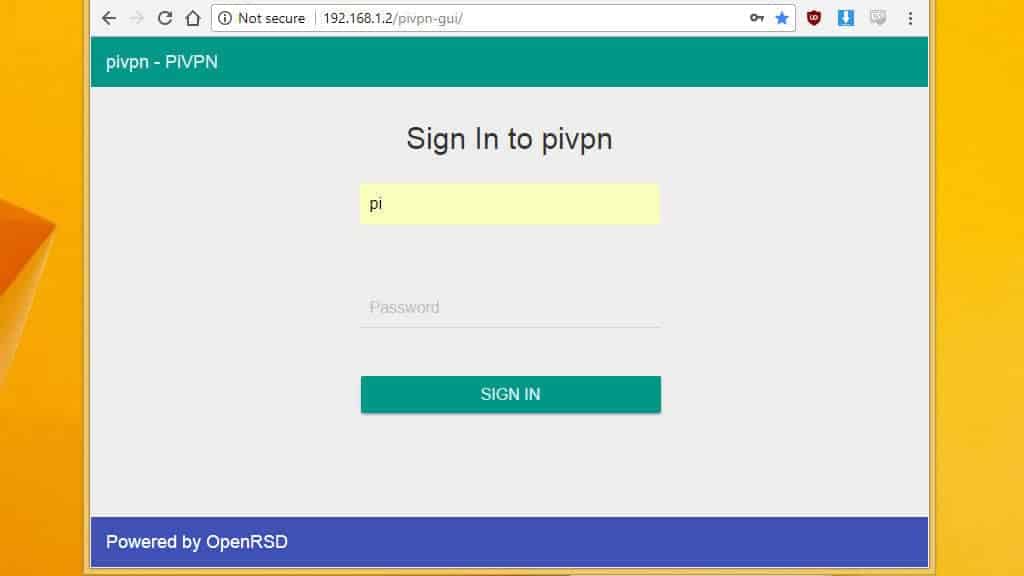
You should use the IP address that corresponds with your installation and open up Pi VPN GUI in your browser.
You lot'll be able to tell if yous've connected successfully when y'all see a login prompt. If you're unable to login, you'll demand to restart your Raspberry Pi.
For now, only bookmark a link to Pi VPN GUI so you can come back to information technology hands. The side by side step is setting up an outbound VPN connection in social club to encrypt your internet connection. If you'd rather non sign upwardly for a service similar IPVanish, you tin skip alee to setting up your router and adding users.
Setting up an outbound VPN connection
If you don't set up an outbound VPN connection, all of the traffic from devices connected to your VPN will connect to the internet using your LAN'south public IP accost. Wherever you lot connect from, websites will think you're connecting from dwelling. That isn't e'er a bad matter; for instance you might want to watch Netflix when yous travel abroad.
Merely to become the most out of Pi VPN, I recommend you use an outbound VPN provider and create what's chosen a 'double-hop' connectedness.
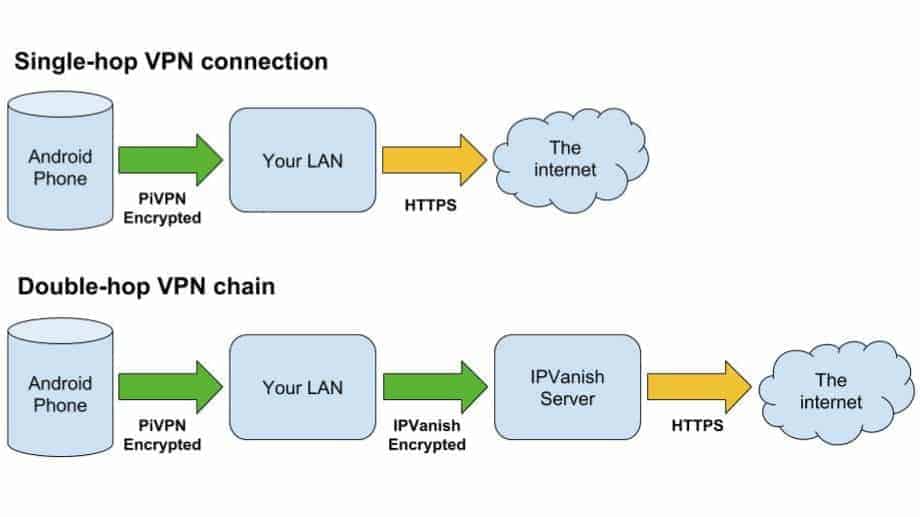
The advantage of a double-hop VPN connection is complete end-to-cease encryption for your mobile internet when you connect to a site over HTTPS. The added security goes across merely having two tunnels, since the outbound VPN server never sees the originating request.
In practical terms, that means whatsoever logs your VPN provider keeps won't exist able to place the device that any individual request came from–everything resolves back to your Pi VPN server. Information technology'south another layer of anonymity for everything you do online.
If you're setting upwards Pi VPN simply to connect to your home network remotely, you can skip this step and move on. But if yous're interested in creating a secure and bearding internet connection for your phones, laptops, tablets, and other devices, you should use an outbound VPN connection along with Pi VPN.
READER DEAL: IPVanish offers a free 7-24-hour interval trial for Comparitech customers if you don't already take a VPN provider.
Using a VPN-enabled gateway router
If you already have a gateway router that supports an outbound VPN connection, your work is done. Since all traffic volition leave your home network encrypted by the router, yous've finer got a double-hop VPN. In which case, you can finish and connect your clients.

If you're interested in learning how to build a VPN-enabled router, or you have one that you'd similar to ready, nosotros have guides for that. If you already take a VPN-enabled router and demand to set it up every bit a VPN client, have a wait at how to choose a VPN provider and set up upwards your router.
The remainder of usa will accept to employ our Pi to handle the encrypted outbound connection and routing required to create a 2d VPN hop.
Using IPVanish as an outbound VPN
IPVanish's low latency makes it a great choice if you're setting upwards a double-hop VPN connection like this, since your connection is waiting on 2 VPN servers to handle traffic. The process will be the same for any VPN provider that publishes OpenVPN profiles for their servers.
You'll demand to download an autologin profile and the digital certificate for your VPN provider. If y'all're using IPVanish, those files are bachelor to download here.
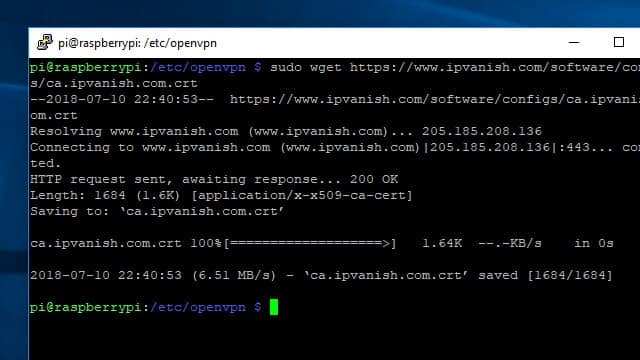
Ane easy style to go the files y'all demand on your Pi VPN server is to connect via SSH and use the wget command to download them from the web. Make sure your Pi VPN server is connected to the internet, so change to the proper directory and download the files you need with these commands:
cd /etc/openvpn sudo wget http://www.ipvanish.com/software/configs/ca.ipvanish.com.crt sudo wget http://www.ipvanish.com/software/configs/ipvanish-US-Chicago-chi-a01.ovpn
Note that you should change the 2d URL to match the IPVanish server you'd similar to connect with. In my case, I'm using an IPVanish server in Chicago.
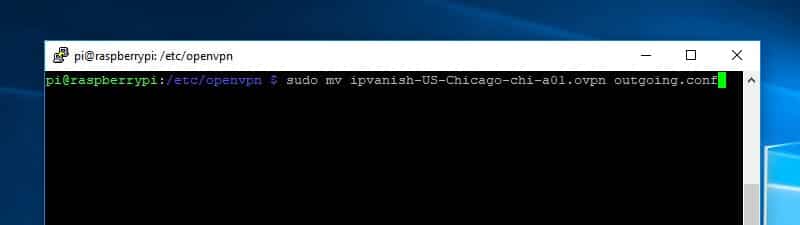
Since you'll connect to IPVanish automatically using the OpenVPN service, it'due south of import to rename the *.ovpn autologin contour you only downloaded. The OpenVPN service will simply connect to profiles with the *.conf file extension. Employ this command to rename the file to approachable.conf:
sudo mv /etc/openvpn/ipvanish-US-Chicago-chi-a01.ovpn /etc/openvpn/outgoing.conf
Now that the files have been downloaded and prepared, y'all're set up to setup the connection to your outgoing VPN provider.
Setting up the IPVanish connexion
It'due south easier to go on track of ii simultaneous VPN connections if you rename each interface to reflect what it does. I similar to use /dev/tun-incoming and /dev/tun-outgoing to refer to the different network interfaces.
Renaming the interfaces also ensures the connections won't flip back and forth between being named /dev/tun0 and /dev/tun1, depending on which one comes online showtime. The device names are of import to know if y'all desire to be able to configure your firewall properly.
Yous can change the name of each interface by editing the connection settings. Each OpenVPN connection has a *.config file associated with it. Changing the first lines in each file renames the network interface.
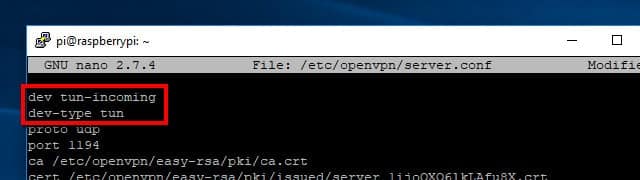
Start by editing Pi VPN's settings, located in /etc/openvpn/server.conf, with the following command:
sudo nano /etc/openvpn/server.conf
Change the first line from:
dev tun
To the following, inserting a new line:
dev tun-incoming dev-type tun
Press Ctrl+X and then Y to save your changes. The next time Pi VPN comes online, it will create a device called /dev/tun-incoming.
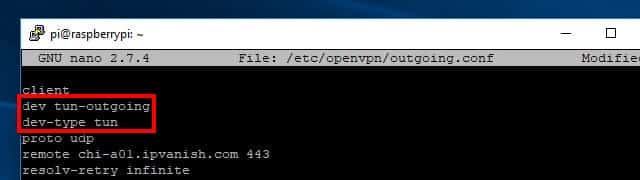
You'll demand to edit the incoming config file at /etc/openvpn/outgoing.confin the same way. Open up it with this command:
sudo nano /etc/openvpn/outgoing.config
Similar before, change the first line and insert a second at the acme of the config file. This ane should read:
dev tun-approachable dev-type tun
But the outgoing VPN connexion needs other changes, besides. You'll demand to signal it to the server certificate you downloaded in a previous stride, and provide your username and password so the VPN can automatically connect.
Edit your approachable.conf file to utilize the IPVanish server certificate. Change the line that starts with ca to read:
ca /etc/openvpn/ca.ipvanish.com.crt
Then update or add auth-user-laissez passer to point IPVanish at your password file, which nosotros'll create soon:
auth-user-pass /etc/openvpn/passwd
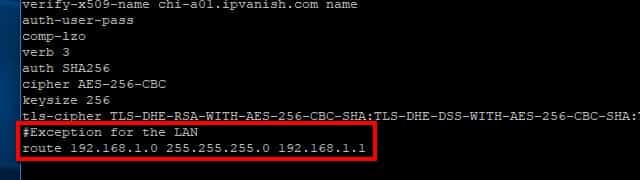
Your outgoing VPN connection besides has to be told not to forward LAN traffic. You'll need to add this line to the end of your approachable.conffile to exist able to access your local network through Pi VPN:
route 192.168.1.0 255.255.255.0 192.168.1.1
Remember to utilise the proper IP address for your LAN if it'south different than mine above. Save your changes to /etc/openvpn/outgoing.confin nano by pressing Ctrl+X, and so Y.
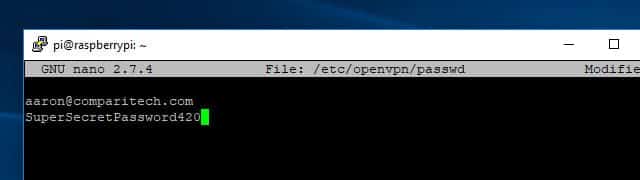
At present, create a password file that OpenVPN tin can use to login to IPVanish with your credentials. The format of this file couldn't be simpler, it's just your username on the first line and your countersign on the 2d. Use this control to create the file and open it for editing:
sudo nano /etc/openvpn/passwd
Enter your email address on the first line and your password on the second, then press Ctrl+Ten, Y to salvage the file. Since /etc/openvpn/passwd contains your credentials in plaintext, it's important that you secure the file. Yous can lock down access to /etc/openvpn/passwd using chmod like this:
sudo chmod +600 /etc/openvpn/passwd
That will ensure only the root user can read or write the passwd file, which is the minimum level of security you demand when storing your credentials in plaintext.
Updating your Raspberry Pi'south routing table
Before you can bring the outbound VPN online to secure your cyberspace connection, you need to set your Raspberry Pi to route the traffic properly. Delight recall to substitute your Pi's static IP address if it's different than mine below.
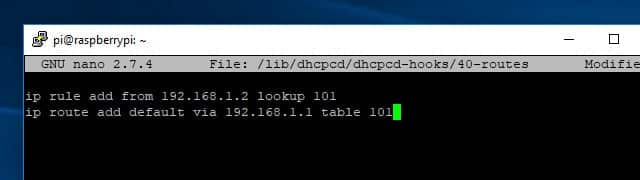
You'll need to create or edit /lib/dhcpcd/dhcpcd-hooks/40-routes and add a few lines. Here's the control:
sudo nano /lib/dhcpcd/dhcpcd-hooks/forty-routes
Add these 2 lines to the script:
ip rule add from 192.168.1.2 lookup 101 ip road add default via 192.168.ane.one table 101
And then printing Ctrl+10, Y to save your changes.
That'southward the only change you'll need to make to your Raspberry Pi's routing table. Afterward you've saved the changes and restarted your Pi, you lot'll be able to run incoming and outgoing VPN connections at the aforementioned fourth dimension.
Securing your DNS requests
In order to brand your connection truly secure, you need to make sure to stop DNS leaks. A DNS leak occurs when your secure VPN connection looks upwardly websites using a DNS server outside of the encrypted network. That exposes your VPN clients to dangers like DNS logging and man-in-the-centre attacks.
The solution is to forcefulness all incoming VPN clients to utilize the secure DNS server of your outgoing VPN provider. In this instance, I'll force my clients to employ IPVanish's DNS servers.
In club to change your DNS servers without having to reinstall Pi VPN, you'll need to update /etc/openvpn/server.conf. Open it for editing using this command:
sudo nano /etc/openvpn/server.conf
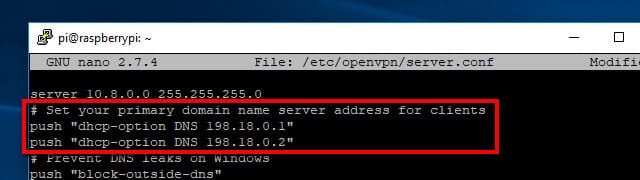
Scroll through the file until y'all see the ii lines that button DNS settings to your VPN clients. I installed Pi VPN using Google's DNS servers initially, so the two lines that need to be changed in my server.conf wait like this:
push "dhcp-option DNS 8.eight.viii.8" push button "dhcp-option DNS viii.8.4.4"
If you're using IPVanish, change these lines to read:
push "dhcp-selection DNS 198.18.0.ane" push button "dhcp-selection DNS 198.18.0.ii"
If you're using a different VPN provider, you'll need to look online to find their DNS servers.
Once you lot've edited the file, save it with Ctrl+X, Y. Your changes will take effect the next time the OpenVPN service is restarted, and your VPN clients will utilise IPVanish's secure servers automatically.
Connecting to IPVanish
Before yous set OpenVPN to automatically connect to your approachable VPN provider, you should exam the connectedness. From the command line, type:
sudo service openvpn@outgoing outset
The screen will fill with text showing yous the state of the VPN connection. Double check /etc/openvpn/outgoing.conf if you have issues connecting, and make certain your username and password are right and on separate lines in /etc/openvpn/passwd.
When you've continued successfully, disconnect from the VPN past pressing Ctrl + C. The last step in creating an outgoing VPN connection is setting information technology to autostart.
Starting the VPN connections automatically
In one case your connection has tested okay, you should set both of your VPN connections to start automatically. OpenVPN makes information technology like shooting fish in a barrel by letting you refer to each connection according to the name of the configuration file.
To get started, you'll demand to edit OpenVPN'southward global configuration file with this command:
sudo nano /etc/default/openvpn
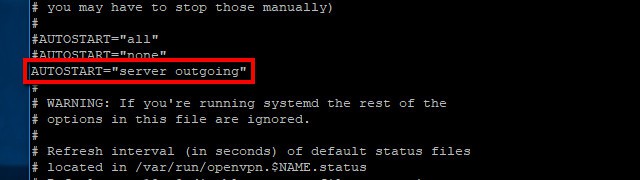
Then uncomment this line:
AUTOSTART="dwelling role"
And change it to read:
AUTOSTART="server outgoing"
Once you lot've finished, save your changes withCtrl+X, Y and restart your Pi VPN server with the following control:
sudo reboot
When your Raspberry Pi reboots, your Pi VPN server will exist connected to the outgoing VPN provider and ready to first handling incoming connections.
Pi VPN router settings
The whole idea of a VPN is that it's a tunnel from exterior of your network to the inside. That means y'all'll demand to setup your router to allow certain connections through. We do this using port forwarding, and it can be very like shooting fish in a barrel or a piddling more difficult depending on your router.
I'one thousand using an entry model Linksys router for this guide, but every consumer router supports port forwarding. Your procedure might be a little different, but almost router manufacturers offering port forwarding guides on the web.
Forwarding the VPN port
No VPN clients can connect to your network unless yous forward the port you specified earlier. Normally all of these requests are blocked by your router for security reasons, but nosotros have to make a special exception. In this case, it's because we need to permit VPN clients connect to Pi VPN through the internet.
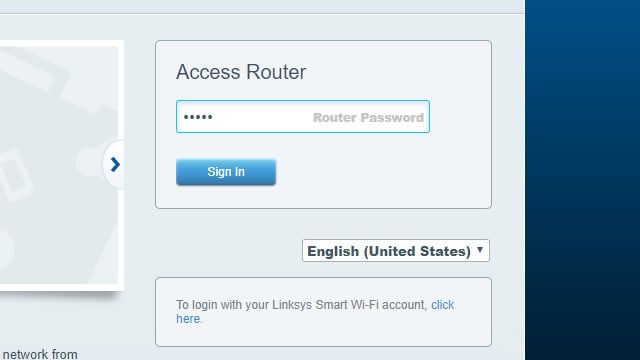
Start by logging into your router. In most cases, you can practice that by clicking here or here. Otherwise discover the IP address of your router and paste it into a browser.

One time yous've logged in, click through the menus until you lot find port forwarding. In my case, it'due south in Apps and Gaming —Firewall Settings.
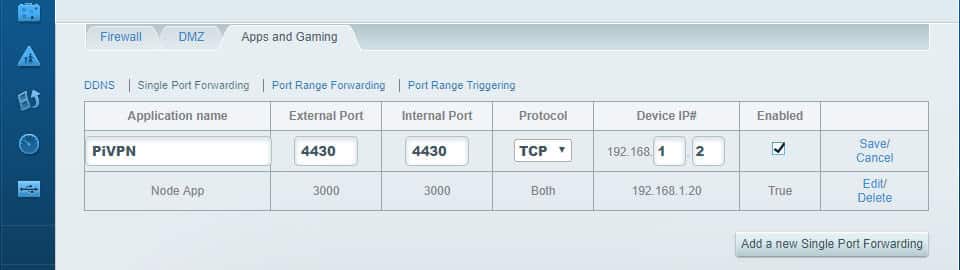
Click to add a new port. You'll demand to know the port number, which you selected earlier. Yous'll too need the static IP address of your Pi VPN server. In my instance, that'southward port 1134 and 192.168.1.2.
Click Save when y'all've setup port forwarding. Now VPN clients will be able to login when they're outside of the local network.
Comcast Xfinity customers notation
I wasn't able to get my Comcast Xfinity router to forward ports properly. The trouble was my router has a built-in intrusion detection system (IDS), which gets used a fleck like a firewall to finish malicious attacks on your dwelling house network. The IDS can't be turned off, and connecting to a VPN through your Comcast router triggers information technology, blocking the connection.

My solution was to put the Xfinity router in bridge manner and connect a wireless router to it. So I was able to use the wireless router to plough on port forwarding and allow connections to my VPN. If you're a Comcast user having problem with port forwarding, go out a comment below for help.
Managing Pi VPN users
Every device that connects to your VPN needs to accept a user account associated with it. When you create each account, Pi VPN will generate an OpenVPN profile. Later, you'll utilise those *.ovpn profiles on your devices to set them up automatically.
Creating profiles with Pi VPN GUI
Here'southward how to add users to Pi VPN. When you're finished, y'all'll exist able to download the contour needed to connect to your private network.
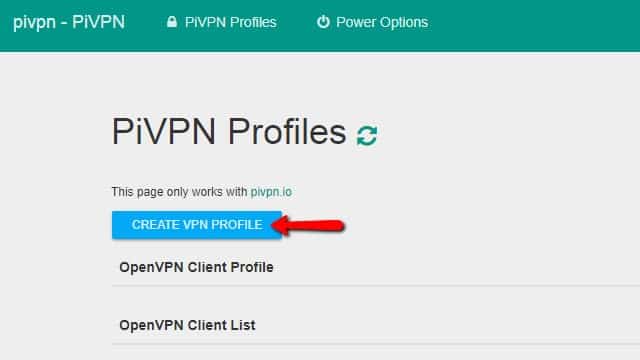
Click the Create VPN contour button to add a new user.
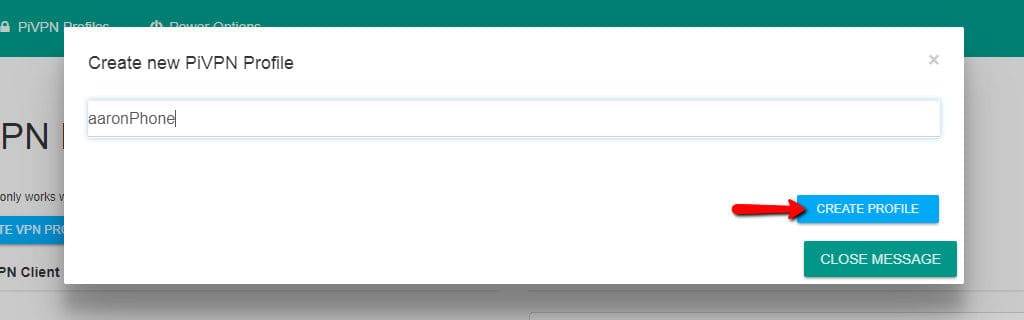
Then type a username and click the Create profile button. I recommend naming each user after the device yous programme to connecting with. Afterwards on, it makes it easy to tell at a glance which devices are connected to the VPN.
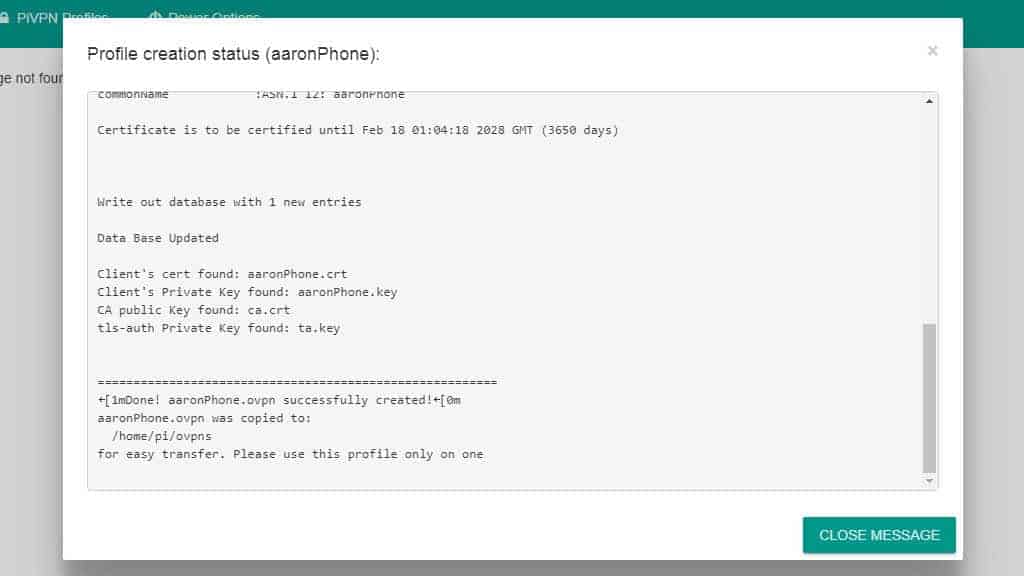
A status window opens so you can follow along with the profile cosmos process. Generating cryptographic keys can accept a long time, specially if you're using 4096-flake encryption.
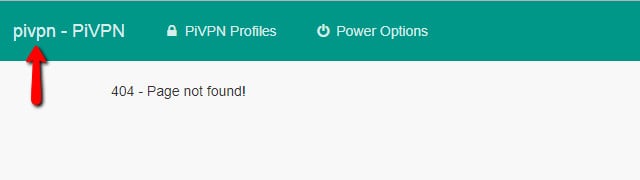
Pi VPN GUI will sometimes accept yous to a 404 message afterward successfully creating a profile. Click the pivpn link in the upper-left corner to render to the profile browser.
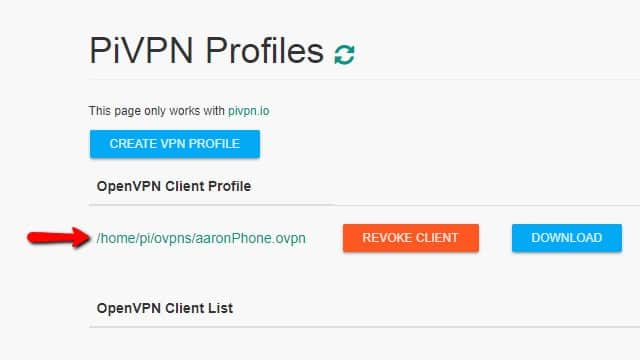
You'll see a path to your OpenVPN client profile, and a button to Download information technology. You tin can click the Revoke client button to remove a user account. Revoking an account will cause the client to disconnect immediately.
Click the Create VPN contour button until you lot have a client contour for each device y'all want to be able to connect to your VPN. For instance, I had profiles for my telephone and tablet, along with a Raspberry Pi that I use to stream TV.
One time you take profiles for each device, yous tin move to the next step and connect to your VPN.
Removing profiles with Pi VPN GUI
Sometimes you'll have a problem with a profile, or want to remove it from your VPN. You can exercise that by revoking the client in Pi VPN GUI.
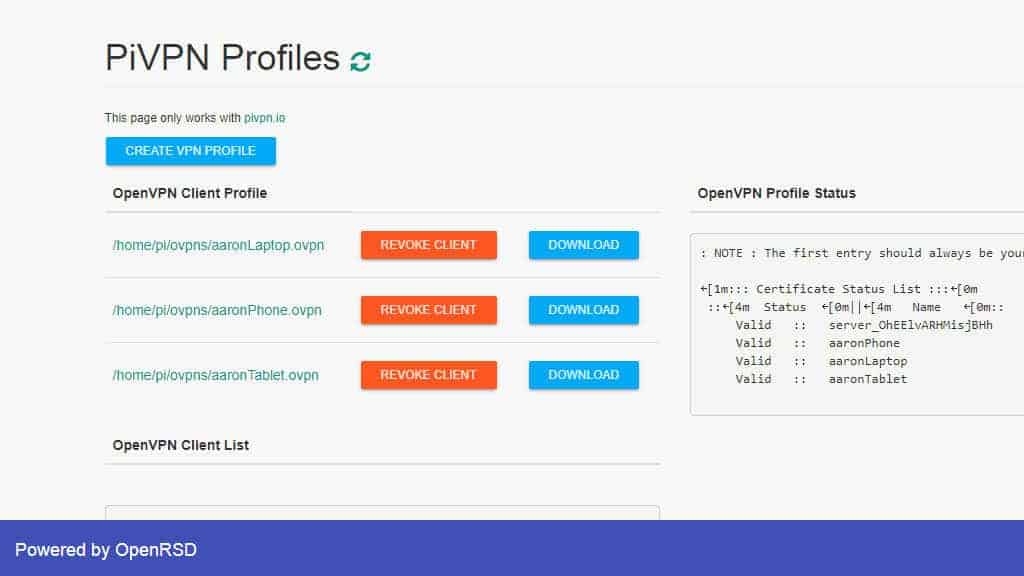
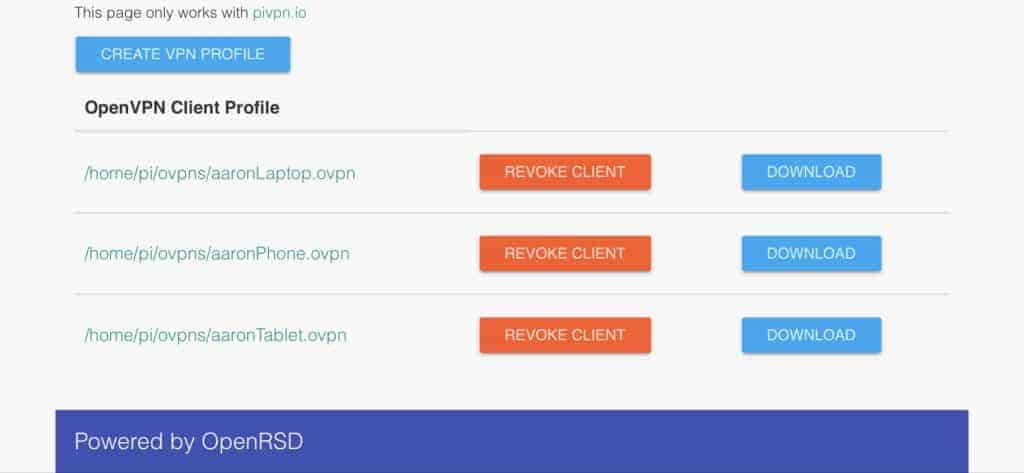
Open Pi VPN GUI and sign in. Yous can see a listing of active profiles on the principal screen.
Click the Revoke profile button for the device you lot desire to remove and the contour will be deleted.
When you refresh Pi VPN GUI, you can see the profile has been removed. Go on in mind that this doesn't delete the one-time *.ovpn file from your hard drive. You lot'll need to remove the file manually using this control:
rm ~/ovpns/profile_name.conf
Be sure to substitute profile_name.conf with the name of your OpenVPN autologin contour.
Even if you lot don't delete revoked profiles, there is no security risk. You'll never be able to log in using a revoked profile, but I recommend you lot delete them to keep things clean.
Installing a mobile Pi VPN client
If you're going to be connecting to Pi VPN on a mobile device, I recommend OpenVPN Connect, the official customer. Information technology's completely gratis and integrates really well with iOS and Android.
The outset step is to open the App Shop or Play Store, depending on your device. In either instance, search for OpenVPN Connect. Agree to the terms and install the app as usual.
See also: How to install OpenVPN client and server on a DD-WRT router
Importing the Pi VPN autologin contour
Y'all'll need to make sure you're connected to your home network over wifi, and so open Pi VPN GUI in a browser. Remember that the path was set much before, and includes the local IP address of your Pi VPN server. In my case, it's http://192.168.1.2/pivpn-gui/.
Log in with the username pi and the proper password.
iOS users: Note that Pi VPN GUI only works properly in Safari. Android users tin can connect with the browser of their choice.
Find the profile you fabricated for your mobile device and click the Download push button.
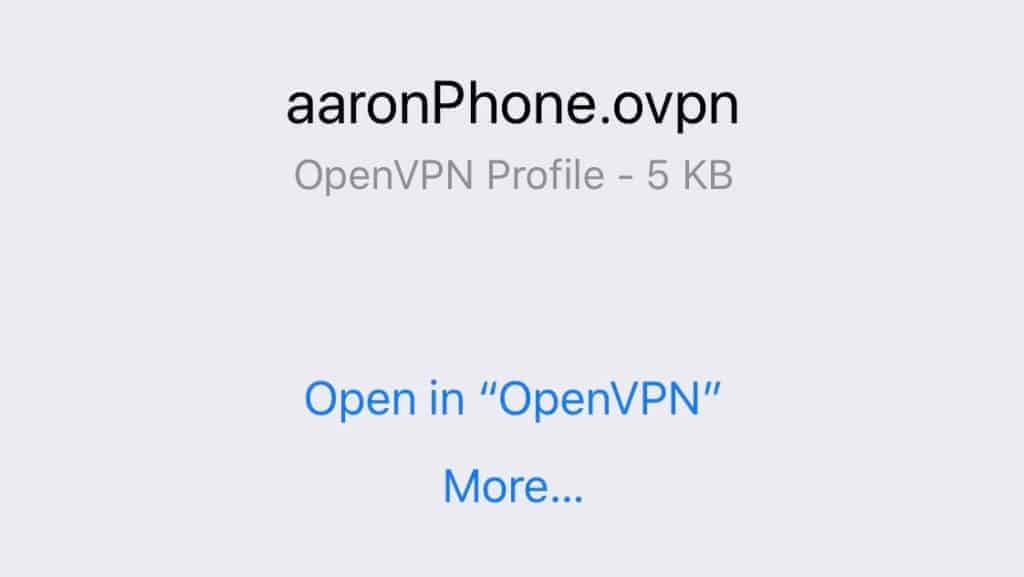
Use OpenVPN connect to import the *.ovpn file. When OpenVPN Connect launches, click the dark-green plus. Your Pi VPN connectedness is ready to connect.
Connecting to Pi VPN
All that's left is to open up the tunnel to Pi VPN using the OpenVPN Connect app.
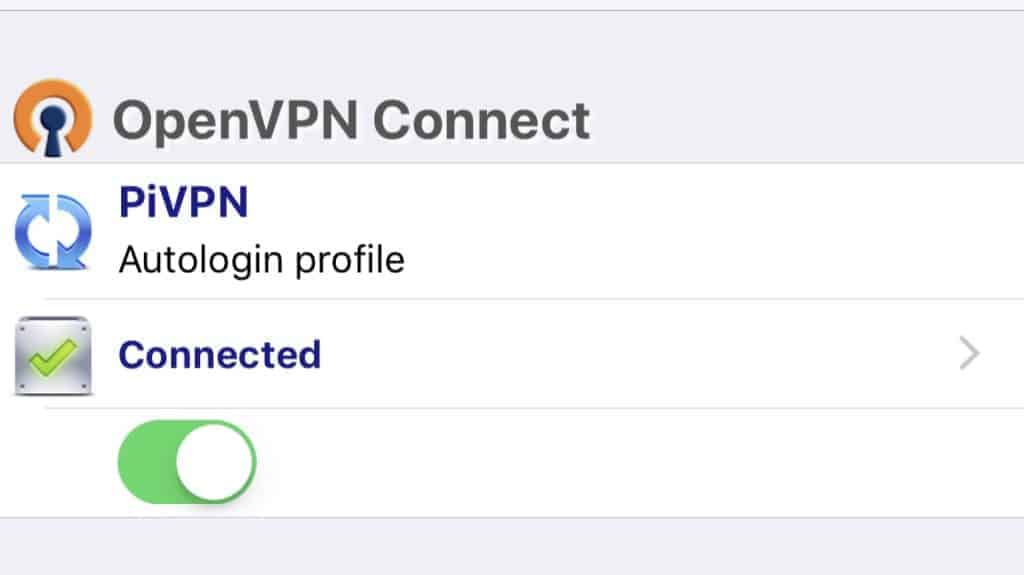
In the app, click the toggle push button to initiate the connection. Information technology should plow light-green, and your phone volition display a VPN badge in the notification area.
You lot can check to brand sure your VPN connection is working past visiting a site like http://www.ipaddress.com. If you're not calculation a computer to your VPN, you're finished and tin skip to the next section.
Installing a Pi VPN client on your calculator
A lot of dissimilar VPN clients are bachelor for Windows and Mac, but I recommend the official OpenVPN client. It's free and easy to install, and lets you import your Pi VPN connection with only a few clicks.
Download the official client here, and install it every bit yous would any other plan.
Importing the Pi VPN autologin contour
If the computer y'all're adding to the VPN is on your LAN, you can download the autologin profile from Pi VPN GUI. Scan to the path where you installed Pi VPN GUI earlier, in my case that is http://192.168.i.2/pivpn-gui/.
If the computer you lot're adding Pi VPN is in a remote location, y'all won't be able to connect directly to Pi VPN GUI. In that example, you'll demand to download the autologin profile using a device on the LAN. Once it's downloaded, adhere it to an email and transport information technology to your remote estimator. Yous tin download the profile from your electronic mail and go on on as usual.

Once you have the autologin profile downloaded, right-click the OpenVPN icon in the organization tray and click Import.
Connecting to Pi VPN
After the Pi VPN connexion has been added, right-click the OpenVPN icon in the organization tray and click the profile name to connect.
You'll come across a condition window announced with the connexion log. If your calculator doesn't connect properly, you can copy and paste the error code to effigy out what went wrong. In most cases, if you can't connect to your VPN, it's because port forwarding wasn't properly enabled.
In one case continued, make sure the VPN is working by visiting a website like http://www.ipaddress.com.
More ideas for Pi VPN and your network
Having a server that's attainable from anywhere makes it the perfect candidate for a lot of different projects. Here are some ideas for your Raspberry Pi now that you're completely finished setting up your Pi VPN server.
Lock down the firewall
Raspberry Pi ships with a very permissive firewall by design, but it's a good idea to be more restrictive when you're running a VPN server.
Here are some sample rules to go you started. Remember to supercede the PROTOCOL and PORT with what you've chosen for your Pi VPN server. Lines beginning with # are comments and don't need to be typed.
#Take incoming traffic on all interfaces, only limit eth0 to VPN only sudo iptables -A INPUT -i eth0 -m state --state NEW -p PROTOCOL --dport PORT -j ACCEPT sudo iptables -A INPUT -i tun-incoming -j Accept sudo iptables -A INPUT -i tun-outgoing -j ACCEPT #Permit forwarding traffic between subnets sudo iptables -A FORWARD -i tun-incoming -j ACCEPT sudo iptables -A Frontward -i tun-outgoing -j Take #Forward traffic through eth0 sudo iptables -A Forwards -i tun-incoming -o eth0 -yard country --land RELATED,ESTABLISHED -j ACCEPT sudo iptables -A FORWARD -i tun-outgoing -o eth0 -k state --state RELATED,ESTABLISHED -j Have #Frontward traffic through tun-incoming sudo iptables -A FORWARD -i eth0 -o tun-incoming -thousand country --state RELATED,ESTABLISHED -j Take sudo iptables -A Forrad -i tun-approachable -o tun-incoming -m state --country RELATED,ESTABLISHED -j ACCEPT #Forward traffic through tun-outgoing sudo iptables -A FORWARD -i eth0 -o tun-approachable -m state --land RELATED,ESTABLISHED -j ACCEPT sudo iptables -A Forrad -i eth0 -o tun-outgoing -yard state --state RELATED,ESTABLISHED -j Have #MASQ tun-incoming equally eth0 sudo iptables -t nat -A POSTROUTING -s 10.8.0.0/24 -o eth0 -j MASQUERADE
Once you've finished, utilise this control to save your changes:
sudo iptables-persistent save
Remember y'all can list currently active iptables rules with the command:
sudo iptables -50
Switch to dynamic DNS
Dynamic DNS adds lets you employ a hostname instead of an IP address to connect to your Pi VPN server, even if you don't take a static address from your Internet service provider. For instance, you might apply dynamic DNS to redirect vpn.websitename.com to your VPN server. If you're thinking about hosting spider web services or email, in many cases you lot can run everything from the same Pi.
Information technology's all-time to re-run the Pi VPN installer if you're going to switch to dynamic DNS. Only once y'all've updated your settings, you lot'll be able to admission your Pi VPN server at the custom URL you lot selected.
Switching to dynamic DNS eliminates the need to reissue Pi VPN client profiles every fourth dimension your public IP address changes.
Set a fileserver
Your Raspberry Pi makes a great Samba fileserver. Yous can plug in a few USB drives, install lvm2 to create one giant filesystem spanning all of the disks, and share out your files to VPN clients.
Enabling Samba across your VPN takes a little piece of work, but it's extremely useful to exist able to admission your files, music, and movies from your mobile devices.
Install Pi-hole
When you ready the DNS provider during the Pi VPN installation, you could hands install Pi-hole, change your Custom DNS provider to 127.0.0.1, and block mobile ads automatically over your VPN.
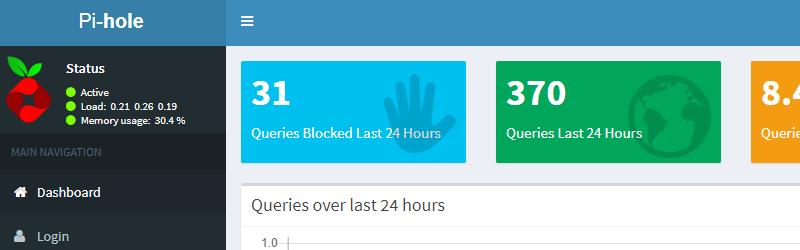
Running Pi-hole on a VPN connection is the all-time way to block mobile ads without rooting your phone. You lot can even turn off Youtube pre-roll ads and cease seeing sponsored products on Amazon. Take a expect at Comparitech'south guide to Pi-hole for more.
Run a seedbox
If you've got an outbound VPN up and running, your internet connexion is completely encrypted. Having an anonymous cyberspace connection is great for torrenting, and turning your Pi VPN server into a seedbox with Transmission is really easy.
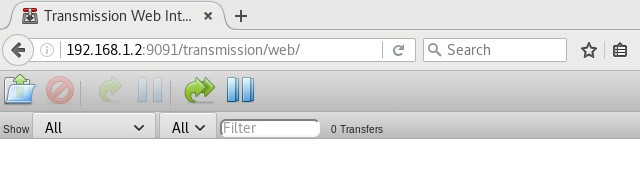
Since the connection is already encrypted, all y'all have to do is install Manual and the web client. You'll be able to add together torrents from your telephone or laptop, and they'll download at abode.
Easily on with Pi VPN
I don't call up I'thousand telling any secrets when I say that I'm a huge nerd. My home network is total of smart devices like Hue lights, a Nest thermostat, and a couple of Sonos speakers. I've got a fileserver with Manual, a Plex server, devices running Kodi, and a bunch of odds and ends like a network printer and DNS server running Pi-pigsty to block mobile ads.
If your home network is annihilation at all like mine, I'd tell you that Pi VPN is a game-changer. Not only have I managed to shut off every port save one on my firewall, but my mobile internet is completely encrypted and I can access my LAN from anywhere. My network security has dramatically improved, and I don't have to configure port forwarding on my router every time I add a new device.
Once you've spent an afternoon setting things up, Pi VPN is almost unbelievably practiced. So many projects for Raspberry Pi are flashy and fun, but ultimately pretty useless. I'm happy to report that Pi VPN is a huge exception.
"Raspberry Pi" past Lucasbosch licensed under CC 3.0

Source: https://www.comparitech.com/blog/vpn-privacy/raspberry-pi-vpn/
Posted by: dillingertist1986.blogspot.com
0 Response to "Which Raspberry Pi Should I Buy 2018 Usenet Torrent Downloading"
Post a Comment